6 POINT ENDCAP DRIVER TOOL
FOR TAC52, TAC65 & TAC67

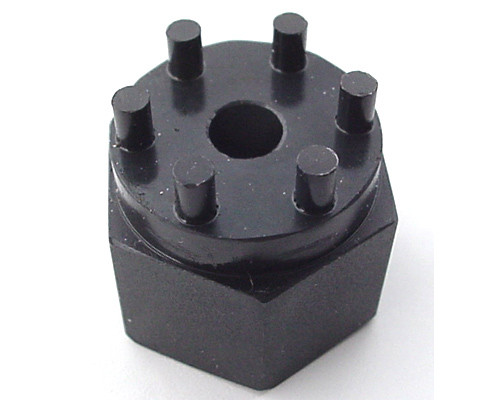
This Endcap TAC DRIVER TOOL is specifically made for the assembly and disassembly of our "Six Point" end cap suppressors, specifically the TAC52, TAC65 and TAC67. We are often asked why we don't just include the driver tools with the suppressor. The answer is that some people choose to never disassemble and clean their suppressor and rather than include them with each suppressor and have to pass along the additional associated cost with each suppressor, each customer has the option.

The six point drive tool is machined from solid 1" hex steel to perfectly fit the complimentary drilled holes in both the front and rear endcaps thus minimizing your chance of damaging the endcap during disassembly. Remember that you'll need TWO TOOLS to make the job easier (please click on the "Instructions" tab for complete disasembly and cleaning instructions). TAC Driver Tools are "must have" accessories for your .22LR TAC suppressor.

Overall Rating: 5 out of 5 1 reviews

Review This Product

By Bryan Of Arkansas
ABSOLUTELY NECESSARY to be able to clean your suppressor! Take my word on this next part... Don't be a cheap @$$ and only buy 1 thinking you can make do with just one.... You will be in my shoes feeling like an idiot for not taking Tactical Inc's advice! You need *** 2 *** of these to get the job done!

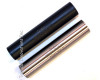
All Tactical Innovations .22LR suppressors have threaded endcaps to allow the user to disassemble them for cleaning and service. Many manufacturers will claim to have "self cleaning" suppressors or that swishing a solvent in the suppressor will sufficiently clean your suppressor. We all know how dirty .22's are, and suppressors wind up with a lot of that dirt in them. Ultrasonic cleaners will remove the carbon and dirt but WILL NOT remove the lead build up.

There are two different schools of thought on the suppressor cleaning issue. Most users are willing to clean their suppressor as necessary to ensure its long life with no problems while other users never disassemble their unit and attempt to clean it as much as possible by soaking or ultrasonic, without ever disassembling it. If you choose to not disassemble your suppressor, eventually it will get leaded up to the point that it will no longer be functional and disassembly will be difficult to impossible. While it's true that you can get away without cleaning a suppressor for a long time (possibly 10's of 1000's of rounds), eventually the lead will get so thick that the bullet will literally have to squeeze through the now undersize hole in the baffle. If you're the kind of shooter that we are, and you want to shoot your suppressor A LOT, we want you to be as happy with your suppressor years down the road as you are with it when you get it. The ability to disassemble the suppressor for cleaning or service without the need to return the suppressor to the manufacturer to have it cut open as required by other manufacturers, is a significant advantage of the TAC series of suppressors over other manufacturers' offerings.

Since .22LR ammo is not jacketed (the copper coated washed bullets are not the same as a jacketed bullet), you will experience lead buildup in addition to carbon and dirt. Each time you shoot any .22LR ammo, a mist of lead leaves the barrel and when it reaches the colder suppressor, it will instantly harden on the suppressor surface and continually build up. The frequency of cleaning will depend on the ammunition that you shoot, since some are dirtier than others. We suggest that you clean your suppressor the first time after a couple 100 rounds so you'll understand the process before it gets too hard to take it apart. There is no need to clean it any more often than you have to based on your difficulty to disassemble it. Generally 2500 to 3500 rounds has been the preferred cleaning frequency that customers have reported but many customers wait for 5000+ rounds. More frequent cleaning intervals, such as after each use, are not necessary and serve no benefit to the suppressor.

Cleaning without disassembly can easily be accomplished with either an ultrasonic cleaner or simply soak it by immersion in a parts washer. DO NOT USE any cleaner that has ammonia in it since it will disolve your suppressor and baffles causing permanent damage. DO NOT use gasoline or kerosene, you stand the risk of exploding the suppressor when you next fire it. Drain it completely, wash it out well with water, shake out any excess water, fire a round or 2 to get the remaining water out and then lightly mist spray with non-flamable oil. You'll be able to remove the dirt and carbon using this method but your will not be able to remove the lead.

DISASSEMBLY STEPS:

  1. ENSURE YOUR FIREARM IS NOT LOADED
    After ensuring that your firearm is not loaded, remove the suppressor from the firearm. You CANNOT take it apart while its still attached to the firearm.
  2. SOAK THE SUPPRESSOR
    The can should be soaked prior to disassembly to aid in disassembly. We recommend a gallon of WD40 in a large plastic jar and leave it in to soak overnight. Spraying some oil into the can will be of minimal to no benefit. Soak it. After soaking, remove from the oil, drain, wash the exterior to remove any oil, dry the exterior.
  3. REMOVE ONE ENDCAP
    You will need MINIMALLY one Assembly & Disassembly Tool to unscrew the caps. We recommend two. Put one tool into a vice and lock it in. Stand the suppressor up on the tool. Place the second tool on the top of the suppressor. Use a 1" wrench to turn the top tool while at the same time push the suppressor down on the bottom tool. Loosen whichever cap unscrews first only about 1/4 to 1/2 of a turn. Do not completely unscrew the cap. Just loosen it at this point.
  4. REMOVE SECOND ENDCAP
    Whichever cap loosened first, align that cap with the driver tool that is locked in the vice. Put the still tight cap up. Align the second driver tool into the still tight top cap. Use either a rubber strap wrench or someone with really strong hands to turn the suppressor tube clockwise while you unscrew the top cap. Completely remove the top cap, then either by hand or with the strap wrench, completely remove the already loosened bottom cap.
  5. REMOVE BAFFLES FROM TUBE
    The baffles will be difficult to remove from the tube since the lead has soldered them together and into the tube. You will be able to see the lead build up especially on the first baffle. There will be a ring of lead around each baffle which has to be broken in order to drive the baffles from the tube. Use a 3/4" diameter wooden dowel cut 7 inches long to tap / hammer the baffles out. The easiest and safest way to accomplish this is to have your buddy hold the tube in the air while you use the dowel and a plastic face lead deadblow hammer to tap the baffles out, alternating from one end to the next. Once you get the first one moving, the rest will move as well since the lead ring has been broken.
  6. CLEAN THE TUBE ID & INSIDES OF BOTH CAPS
    Use a soft brush to clean the inside of the tube so that you can slide the baffles back in for reassembly. Do not use any hard brushes that will damage the finish inside of the suppressor tube. Similarly, do not use any solvents or cleaners with ammonia or similar that will disolve aluminim. Scrub the insides of the caps. Do not scrub the threads. After a lot of use, it may become necessary to clean the 1/2x28 thread with a class 2B tap. A tap can be purchased on line from MSCDIRECT. Use caution when chasing the threads with a tap since the tap is capable of incorrectly cutting new threads in the cap. The tap should by used by hand only to clean the existing threads if necessary.
  7. CLEAN THE BAFFLES
    The baffles will never be shiny aluminum and they don't need to be. The preferred method of cleaning is to abrasive blast each baffle until all of the lead has been removed.  Although it takes a lot of abrasive blasting to damage the baffles, if you were to use high air pressure and very coarse abrasive, and stay in one spot for too long, its possible to damage a baffle.  Use common sense and good judgement and it will be difficult to damage the baffles.

If you do not have access to an abrasive blast cabinet, you can usually get someone at the local machine shop or car repair to either do them or let you use there cabinet for a very reasonable fee.

As a last resort, you can try to use a brush to clean the baffles to remove any large deposits, ensuring that the ports and vents are not in any way blocked.  However, it is almost impossible to get the baffles clean with only a brush.

Also note, that there is NO solvent / cleaner / chemical that will remove the lead and not also damage the aluminum baffles since if it will take the lead off, it will also damage the aluminum baffels.  In addition, the resultant solution is highly toxic and is a hazmat which requires stringent disposal requirements.  Disposal in the drain or on the ground could get  you in big trouble.

          To clean the inside of the tube, Sears sells a small 3 stone brake hone that will easily fit a 1" tube.  When placed on an electric drill, you should lightly oil the inside of the tube and using the brake hone will remove the lead rings in the tube.  As long as you don't over hone the tube, only the lead rings will be removed and the inside of the tube will be nice and smooth and the ID will not change.

  1. REASSEMBLY
    A small amount of "Never Seize" or "No Seize" (which is used on automobile exhaust manifold bolts and is available at any auto parts store) on the endcap OD threads, will facilitate future disassembly. To assemble, screw the rear cap (1/2x28 hole in it) on to the tube first, paying attention to orient the lettering on the tube correctly. Use the driver tool that is still in the vice to hand tighten the rear cap as tightly as you can get it by hand. DO NOT use the strap wrench or any other tools. Insert the baffles from the front of the can with the flat surface first and the cone second (the bullet goes through the flat part of the baffle first), spiraling the baffles every 90 degrees as you put them in. Screw on the front cap and use the same driver in the vice to HAND torque it. You should have tight baffle compression between the caps and there should be between 0.000 and 0.004 gap between the tube and the front cap (about the thickness of a piece of paper). If there is more than that, the baffles are not clean and the dirt is making them longer and / or you need to HAND torque the front cap a little more. Visually verify that the bullet path through the suppressor is unobstructed. Shoot 3-5 rounds to compress the baffle stack and then retorque the cap.


GENERAL NOTES:

  1. REPLACEMENT PARTS
    If you need any replacement parts for your suppressor, the suppressor will need to be returned. Per ATF regulations, we will not ship individual parts even if you send us your damaged parts.
  2. DON'T DAMAGE THE SUPPRESSOR
    If you follow these disassembly steps, you'll notice that no propane torches, vice grips, pipe wrenches etc are specified in the disassembly SOP. If you use alternate holding and turning methods, please MAKE SURE that you don't damage the suppressor. The potential for most damage should be obvious before it happens. You should be able to disassemble and reassemble your suppressor for a lifetime of use without damaging the unit. If you do damage the suppressor tube (which has the serial number), per ATF regulations we are unable to replace the damaged tube with another tube with the same number.  A damaged tube means the suppressor is lost.
  3. I CAN'T GET IT APART / I DON'T WANT TO FOOL WITH IT
    If you give up and can't get it apart, or you just don't want to fool with it, BEFORE you damage the suppressor, we can usually get any suppressor apart at our facility. Disassembly and cleaning is based on our shop rate of $65 / hour with a one hour minimum. Depending on how badly your suppressor is leaded together, we can usually get it disassembled and back together in approx an hour of shop time as well as whatever parts need to be replaced. Contact us for a work order form before shipping your suppressor back to us.

    Email or call if any questions, we're glad to help!

PROP 65 WARNING: This product can expose you to chemicals including lead, which are known to the State of California to cause cancer and birth defects or other reproductive harm. For more information go to www.P65Warnings.ca.gov.