


Restricted item
Checking...
Yes... We can ship this to {{ stateToCheck }}.
No... We cannot bill or ship this to {{ stateToCheck }}.
Invalid request or service not available. Please try again.
Attention
Restricted item
Checking...
Yes... We can ship this to {{ stateToCheck }}.
No... We cannot bill or ship this to {{ stateToCheck }}.
Invalid request or service not available. Please try again.
Attention
PRODUCTION HAS RESUMED AND GEN 2 KITS ARE SHIPPING!
Ammunition is finally available so we have resumed production of the AM15 UPPER RECEIVER KITS once again. We are in the process of assembling and machining additional parts to satisfy customer demand based on the current "Notify Me" list. If you have an M16 (ONLY AN M16 MACHINE GUN, NO AR15 SEMI-AUTO RIFLES) and want an AM15 Upper Receiver Kit, the best thing to do if you have not already, is to add your email address to the "Notify Me" link and you will get an automated email as soon as they are in stock and ready to ship. We are currently in the process of going through the list in the order received and contacting customers.
GEN 2 KIT IMPROVEMENTS NOW STANDARD:
AM15 GEN TWO KITS now include a considerable number of changes and improvements. After many years of customer suggestions and feedback with Gen 1 kits as well as our own "testing" with many cases of ammo, we've taken the original AM15 to the next level with features that make GEN2 kits incredibly reliable and fun to shoot!
1. We slowed it down! Most .22LR machine guns are way too fast. However, now you can enjoy .22LR full auto fire at approx. 850 rounds per min (YES 850 RPM!) with increased reliability as well. That translates into a lot of trigger time per drum!
2. CNC Machined Feedblocks: We no longer use the cast feedblocks from E&L and now include a precision CNC machined feedblock with all Gen 2 kits as standard. The feedblock is one of the most important parts of the kit and a CNC machined feedblock permits consistent reliable operation time after time along with easy drop-in replacement capability with no gunsmithing required.
3. Improved Buffer System: Our Gen 2 buffer system allows the upper to be easily separated from the lower without any op rod or spring in the way. Just like a standard AR15 upper receiver, swapping the upper on and off now takes only seconds.
4. Fully Adjustable For Different Brands of Ammo: The kits are designed to run with CCI MiniMags but can quickly and easily be adjusted to run with a variety of different ammo. Due to the huge differences in ammunition quality and recoil etc, our Gen 2 kit now has the ability to easily adjust the buffer and recoil spring to reliably accomodate a wide variety of ammunition which can easily be fine tuned by the customer for optimal performance. When desired or necessary, the gun can be changed from the original factory setup for CCI Mini Mags to other ammunition such as Federal bulk hollow points in less than a minute (once you determine the optimal configuration for the ammunition you want to run).
5. All GEN 2 changes are fully compatible with Gen 1 kits. Upgrades from GEN 1 to Gen 2 kits will require our modification of the bolt and top cover as well as a new spring, buffer and buffer stop. Customers with original older Gen 1 kits, at their option will soon be able to either purchase a Gen 2 bolt, top cover and buffer system or send in their original parts for modification at a considerably reduced cost. A CNC machined feedblock for upgraded reliabilty is also available as a replacement or spare for the original cast feedblocks.
The AM15 Gen 2 Kits solve not only the design issues inherent in the transferable and pre-May AM180 machine guns as well as the "improved" last "D" version AM180, but also fixes and solves the problems that continued to plague that final "D" version AM180. The AM15 takes high capacity .22LR full auto fire to the next level with a reduced rate of fire and reliability that the AM180 machine guns were seldom able to achieve with any consistency. Our AM15 Gen 2 kits run!
==============================================================
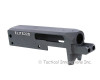
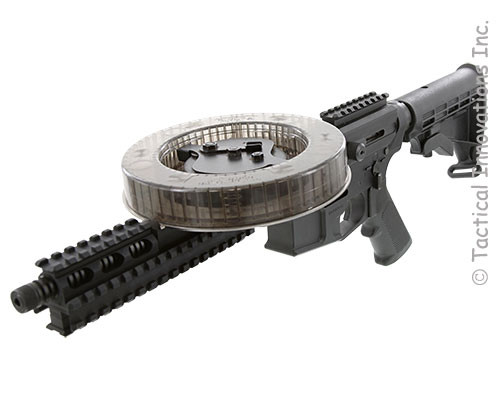
The AM15 full auto UPPER RECEIVER allows you to shoot unmodified .22LR American 180 drums, in either 165 round or 275 round capacity on YOUR M16 host receiver. The full auto AM15 upper receiver conversion is a BATF APPROVED OPEN BOLT drum fed .22LR rimfire caliber conversion that ejects through the AR mag well. It uses Colt Light Machine Gun style open bolt fire control parts, which are included with the AM15 conversion. The AM15 conversion will only work on registered receiver sear drilled M16 lowers. It WILL NOT work with drop-in auto sears or with lightning links.
THIS CONVERSION WILL NOT WORK ON ANY SEMI AUTO AR15. M16 ONLY
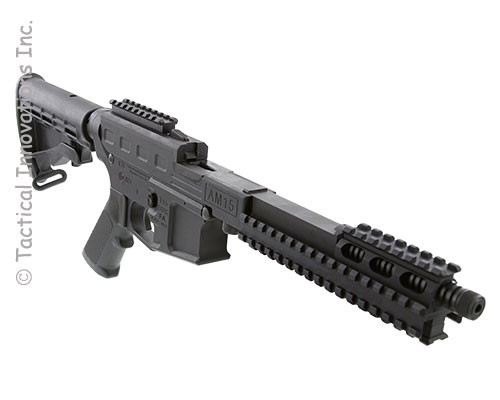
The AM15 Upper Receiver has a flattop style top cover that works well with an Eotech or comparable optic sight (which are not included with the AM15 Upper Receiver Conversion). The AM15 Upper Receiver comes standard with a billet machined quad mount ventilated barrel rail system which will allow the user to install any optional AR accessories of their choice on either of the 4 different mounting rails. The full auto 9.5 inch barrel is threaded 1/2x28-.400 and will accept AR flashhiders or full auto rated suppressors.
The complete AM15 Upper Receiver assembly, open bolt fire control parts, recoil buffer assembly, along with one plastic 165 rd drum with stainless steel baseplate installed, winder and barrel with quadrail and no sights is $3799.99 plus actual shipping.


Overall Rating: 4.86 out of 5 7 reviews
Frequently Asked Questions For
| AM15 UPPER RECEIVER - FREQUENTLY ASKED QUESTIONS |
|
1. Has ATF approved the AM15 as a "non-gun"? (return to top) 2. Will the AM15 work with ANY AR15 / M16? (return to top) 3. Does the M16 lower receiver have to be modified in any way? (return to top) 4. Is a closed bolt AM15 Upper Receiver available? (return to top) 5. Do I have to swap my closed bolt fire control group for the supplied open bolt fire control group in order to use the AM15 Upper Receiver each time? (return to top) 6. Will the AM15 Upper Receiver work with a RDIAS (Registered Drop In Auto Sear)? (return to top) 7. Will the AM15 Upper Receiver work with a Lightening Link? (return to top) 8. Is the AM15 Upper Receiver guaranteed to run 100% flawlessly? (return to top) 9. What's included with my AM15 Upper Receiver order? (return to top) 10. What speed does the AM15 run? (return to top) 11. What ammo do you recommend? (return to top) 12. How is the AM15 Upper Receiver assembled? How do you load the drums? Etc... (return to top) 13. Is the barrel threaded for a suppressor? What thread? (return to top) 14. Do the AM15 parts interchange with my transferable or pre-may AM180? (return to top) 15. Can a gutted AR mag be used for a brass catcher? (return to top) 16. Are there any plans to manufacture an AM15 Upper Receiver in additional calibers, such as .22mag, 17rim, 50 BMG etc? (return to top) 17. I live in a state that does not allow high capacity magazines? Does the 165 round drum that comes with the AM15 count as a high capacity magazine? Since its part of the package, can you make an exception and still ship me the drum? (return to top) |
|
AM15 ASSEMBLY FOR M16
Your AM15 UPPER RECEIVER .22LR
CONVERSION KIT will allow you to easily convert your M16 registered lower
receiver into the same functionality of an American 180 .22LR machine gun with
increased reliability and updated features. Before you install the AM15 on your
M16 lower receiver and attempt to fire the AM15, please read all of these
Installation Instructions carefully and also read the Operating Instructions.
For ease of reading, the Assembly Procedure is divided into 4 sections:
1. AM15 OPERATION, FUNCTION & AMMUNITION OVERVIEW
2. AM15 BUFFER ASSEMBLY
INSTALLATION
3. AM15 FIRE CONTROL
ASSEMBLY AND OPERATION
4. AM15 UPPER RECEIVER
FINAL ASSEMBLY
SECTION 1: AM15 OPERATION AND FUNCTION OVERVIEW
CAUTION: ENSURE THAT YOUR M16 IS NOT LOADED PRIOR TO CONTINUING
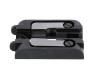
Prior to installing your new AM15 Upper Receiver 22 LR Conversion Kit (AM15) onto your M16 machine gun lower receiver, first unpack and verify that you have all parts and familiarize yourself with the name of each. Please refer to the photo and the corresponding numbers:
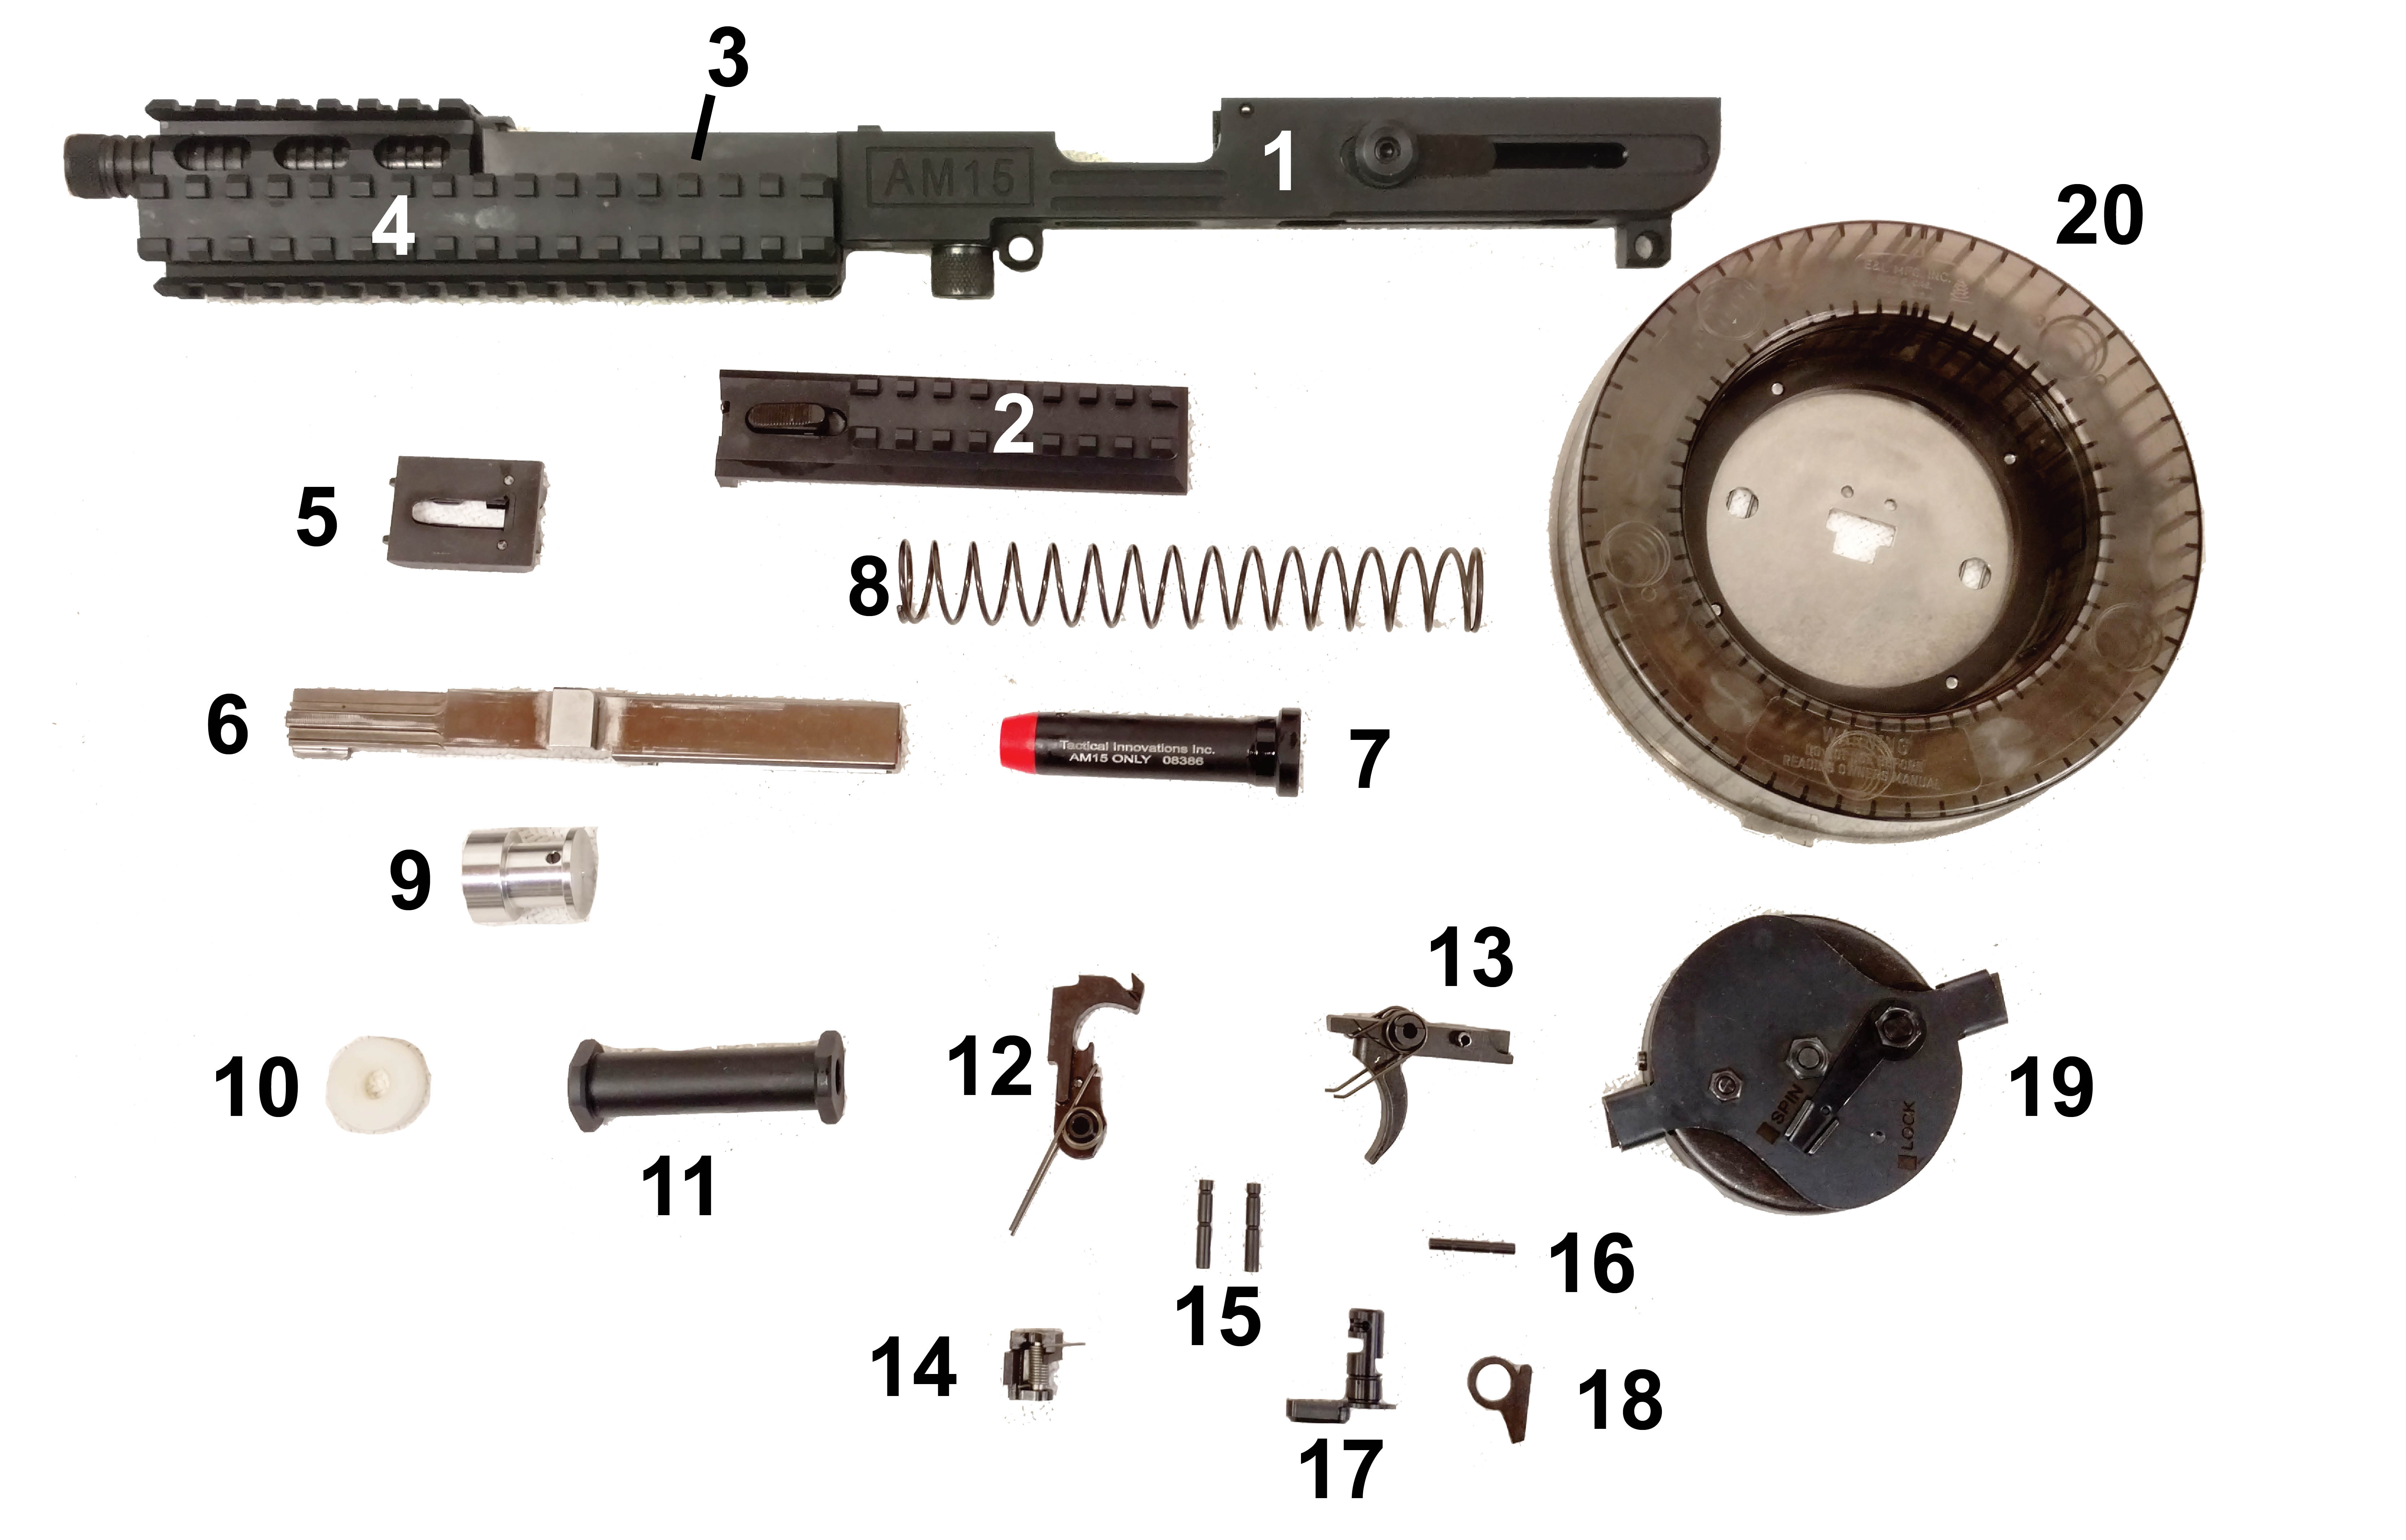
1. Upper Receiver Assembly
2. Top Cover Assembly
3. Barrel and 4. Quad Rail Assembly
5. CNC Machined Feedblock Assembly
6. Gen 2 Bolt Assembly
7. Standard Weight Buffer Assembly
8. Standard Force Buffer Spring
9. Adjustable Length Buffer Stop
10. Buffer Tube Spacer
11. A2 Stock Spacer
12. Hammer & Spring Assembly
13. Trigger & Spring Assembly
14. Sear & Spring Assembly
15. Hammer / Trigger Pins
16. Sear Pin
17. Safety Selector
18. Connector Link
19. Winder
20. Plastic Drum with Stainless Steel Baseplate
1. AM15 OPERATION, FUNCTION & AMMUNITION OVERVIEW
The AM15 Upper Receiver .22LR Conversion Kit is patterned after the original American 180 .22LR machine gun which fires from an OPEN BOLT, which means that it fires from the bolt in the rearward position like an UZI, MAC or a Thompson. A traditional M16 fires from a closed bolt, meaning that the bolt is mated with the barrel with a round in the chamber, waiting for the trigger to be pulled or for the sear to release the hammer when the gun is ready to fire, much like almost all modern semi-automatic firearms operate.
CAUTION: If you are unfamiliar with the function and safe handling of an open bolt fully automatic firearm, you should seek and obtain competent assistance, training and guidance PRIOR to attempting to use your AM15 Upper Receiver Conversion Kit.

Open bolt operation of the AM15 provides many functional advantages that far outweigh the minimal inconvenience of having to swap your M16 lower fire control parts. The AM15 Conversion Kit comes with the required Colt Light Machinegun pattern open bolt fire control parts to convert your M16 lower to operate similarly to the Colt Light Machinegun open bolt configuration. Note however that there are functional differences between the AM15 operation and Colt LMG operation.
CAUTION: Installation of AM15 fire control parts in your M16 will NOT permit 5.56 Colt LMG operation and should not be attempted.
Using the Colt Light Machinegun operating principle, the hammer, trigger, and sear are replaced with similar looking parts and the parts now assume a different role in the operation of the firearm (please refer to the associated cutaway picture). Specifically:
(1) HAMMER BECOMES THE SEAR - The hammer now becomes the sear, in that it engages the bolt and holds it back ready to fire or it disengages the bolt and allows the bolt to reciprocate while firing.
(2) SEAR BECOMES AN ACTUATOR - The sear now becomes an actuator for the hammer (which is now the sear). As you pull the trigger, the sear rocks the hammer (which is now acting as a sear) to either capture or release the bolt. At no time does the hammer ever release from the sear and the hammer travel forward even when firing. The hammer will remain mated with the sear at all times regardless of trigger manipulation.
For simplicity and clarity, although the function of the parts change, each part will retain its traditional description for these assembly and operation instructions (ie the hammer is the hammer and the sear is the sear etc).
In its open bolt configuration, the AM15 does not have a moving firing pin. Primer ignition is accomplished by means of a permanently machined firing pin in the face of the bolt. Each time the bolt moves forward, it strips a round of ammunition from the feed block and chambers it. When the round is fully chambered and the bolt cannot continue any farther forward, the firing pin crushes the rim against the face of the barrel and ignites the round. Thus it is not possible to chamber a round without firing it using an open bolt machine gun. A round can ONLY BE IN THE CHAMBER WHEN IT IS BEING FIRED.
CAUTION: DO NOT ATTEMPT TO CHAMBER A LIVE ROUND UNLESS YOU INTEND FOR IT TO FIRE SIMULTANEOUSLY.
CAUTION: If you are unfamiliar with the function and safe handling of an open bolt fully automatic firearm, you should seek and obtain competent assistance, training and guidance PRIOR to attempting to use your AM15 Upper Receiver Conversion Kit.
2. AMMUNITION OVERVIEW
There is obviously a huge difference in ammunition between multiple brands and loads. With any .22LR machine gun, the ammunition is often the weakest link in the reliable performance of the firearm. We have tested with many major brands and have reached the following general conclusions that you should be aware of when stocking up on ammo to feed your AM15 Conversion Kit. If you use unreliable or under-powered ammunition or ammunition that is not correctly “balanced” to the spring and buffer, your AM15 may not function reliably or safely.
Your AM15 is designed to function with CCI Mini-Mag 40 grain high velocity plated bullets. All development and function testing prior to shipping is done with 40 grain CCI Mini-Mag high velocity ammunition, which is what the supplied STANDARD WEIGHT BUFFER and STANDARD WEIGHT BUFFER SPRING are matched to work with. You can shoot other ammunition but may find it necessary to use either the REDUCED FORCE BUFFER SPRING and / or vary the buffer weights using the ADJUSTABLE WEIGHT BUFFER ASSEMBLY (each available separately).
WAX LUBRICATED BULLETS ARE NOT RECOMMENDED. Bullets that are not plated and are wax lubricated or are powder lubricated will quickly leave considerable residue on the baseplate as the rounds rotate in the drum. As this residue builds up, it will increase the drag on the rounds in the drum as they move around the baseplate which will quickly decrease reliability.
SECTION 2: AM15 BUFFER ASSEMBLY INSTALLATION
CAUTION: If you are unfamiliar with the function and safe handling of an open bolt fully automatic firearm, you should seek and obtain competent assistance, training and guidance PRIOR to attempting to use your AM15 Upper Receiver Conversion Kit.
BUFFER ASSEMBLY INSTALLATION
1. Remove your 5.56 upper receiver from M16 lower receiver. No parts are interchangeable.
2. Remove the 5.56 buffer and spring from the stock tube. Neither the 5.56 buffer or spring are used with the AM15 Upper Receiver Kit.
3. The AM15 kit can be used on either a collapsible CAR stock or an A2 fixed length stock. For use with a fixed length A2 stock, first place the A2 STOCK SPACER (#11) into the buffer tube (either end first – there is no directional orientation). For use with a CAR collapsible stock, the A2 STOCK SPACER is not required or used.
For use with a CAR collapsible stock or after already placing the A2 STOCK SPACER into your A2 fixed length stock, next place the ADJUSTABLE LENGTH BUFFER STOP (#9) into the buffer tube. The ADJUSTABLE LENGTH BUFFER STOP should be placed in the buffer tube with the flat portion going in first (with the flat facing the shooter) and the hollow portion facing away from the shooter. At this time, DO NOT tighten the set screw to lock the length of the assembly until the correct length has been determined. It is not possible for us to “pre-adjust” the ADJUSTABLE LENGTH BUFFER STOP due to the minimal variations in buffer tube lengths. Unlike 5.56 buffer assemblies, the distance the buffer can travel in the buffer tube is critical in the AM15 and the ADJUSTABLE LENGTH BUFFER STOP is used to compensate for buffer tube length differences.
The exact correct length of the ADJUSTABLE LENGTH BUFFER STOP is easily determined by the following steps:
3a. With the ADJUSTABLE LENGTH BUFFER STOP (#9) in the buffer tube, place the STANDARD WEIGHT BUFFER ASSEMBLY (#7) in the buffer tube. Do NOT install the STANDARD FORCE BUFFER SPRING (#8) at this time.
3b. With the STANDARD WEIGHT BUFFER ASSEMBLY installed, remove the TOP COVER ASSEMBLY (#2) from the UPPER RECEIVER ASSEMBLY (#1) by depressing the detent on the left side which will allow the top cover to slide forward to permit it to be lifted off of the UPPER RECEIVER ASSEMBLY. Do not pry it off or use a hammer or similar. It may be a little bit tight from the anodizing but if you lightly tap the rear of the UPPER RECEIVER ASSEMBLY while depressing the detent, it will slide forward approximately a half of an inch which will permit it to be easily lifted off.
3c. Remove all closed bolt M16 lower receiver fire control parts to include (1) hammer and pin, (2) trigger, disconnector and pin, (3) sear and pin, (4) selector. Use caution not to lose the detent and spring for the selector that are installed under the pistol grip. It is not necessary to remove the front or rear take down pivot pins, the magazine catch or the bolt catch. Place the UPPER RECEIVER ASSEMBLY (without the TOP COVER ASSEMBLY installed) on your M16 lower and secure it with your standard front and rear takedown pins.
3d. Carefully manually push the BOLT ASSEMBLY in the UPPER RECEIVER ASSEMBLY rearward to contact and push the STANDARD BUFFER ASSEMBLY until it makes firm contact with the ADJUSTABLE BUFFER STOP. The rearward travel of the BOLT ASSEMBLY (#6) should firmly positively stop when the STANDARD WEIGHT BUFFER ASSEMBLY contacts the ADJUSTABLE BUFFER STOP BEFORE the BOLT ASSEMBLY makes contact with the rear of the UPPER RECEIVER ASSEMBLY.
(Add Graphic)
3e. Included with your AM15 kit is a piece of GREEN plastic cord. This cord should be used as a feeler gauge between the BOLT ASSEMBLY and the rear of the UPPER RECEIVER ASSEMBLY when the BOLT ASSEMBLY is at its maximum reward travel. The UPPER RECEIVER ASSEMBLY can be pivoted forward by (1) returning the BOLT ASSEMBLY to its full forward position and (2) removing the M16 rear takedown pin, thus allowing the STANDARD WEIGHT BUFFER ASSEMBLY and ADJUSTABLE LENGTH BUFFER STOP to be removed by depressing the buffer detent. The length of the ADJUSTABLE LENGTH BUFFER STOP can then easily be increased or decreased by rotating its two threaded pieces in order to achieve the exact gap between the BOLT ASSEMBLY and the upper receiver as measured by the thickness of the green plastic cord as a feeler gauge.
3f. Once the gap between the BOLT ASSEMBLY and the rear of the UPPER RECEIVER ASSEMBLY is correctly spaced by increasing or decreasing the length of the ADJUSTABLE LENGTH BUFFER STOP (as measured with the green plastic cord as a feeler gauge), the set screw in the ADJUSTABLE LENGTH BUFFER STOP should now be tightened to lock it at the correct length for your buffer tube. Use care to not strip the threads by using unnecessary additional torque force.
3g. Re-install the correctly spaced AJUSTABLE LENGTH BUFFER STOP in the buffer tube, then the STANDARD FORCE BUFFER SPRING (#8) and then the STANDARD WEIGHT BUFFER ASSEMBLY.
NOTE 1: In the event the distance required to correctly set the gap between the BOLT ASSEMBLY and the rear of the UPPER RECEIVER ASSEMBLY exceeds the adjustment travel of the ADJUSTABLE LENGTH BUFFER STOP, a BUFFER TUBE SPACER (#10) is included and should be inserted in the rear of the buffer tube before the ADJUSTABLE LENGTH BUFFER STOP is placed in the buffer tube. If you are using an A2 full length stock, the A2 STOCK SPACER should be placed in the buffer tube first, before placing the BUFFER TUBE SPACER in the buffer tube.
NOTE 2: The gap distance between the BOLT ASSEMBLY and the rear of the UPPER RECEIVER ASSEMBLY is critical. At no time should the BOLT ASSEMBLY ever be permitted to impact the rear of the UPPER RECEIVER ASSEMBLY. AN INCORRECT TOO SHORT LENGTH OF THE ADJUSTABLE LENGTH BUFFER STOP WILL RESULT IN DAMAGE TO YOUR UPPER RECEIVER. Minimal additional gap distance between the BOLT ASSEMBLY and the rear of the UPPER RECEIVER ASSEMBLY will have negligible impact on the function of the AM15 Upper Receiver.
After initial firing, and periodically thereafter, it is advisable to check and reconfirm that the appropriate gap between the bolt and the rear of the upper receiver has not changed. Although it should not change, if you determine that it has changed, you can add a drop of thread locker to the set screw on the BUFFER TUBE SPACER to ensure that it retains its correct position.
NOTE 3: Since there is a considerable difference in buffer tube lengths between manufacturers, in the event you want to use your AM15 Upper Receiver Kit on a different M16 or with a different stock, you will have to once again set the ADJUSTABLE LENGTH BUFFER STOP overall length to correctly accommodate the stock you want to use at that time. This entire process is very fast and should take less than a minute or two.
Your AM15 buffer parts are now installed and you can proceed with the installation of the open bolt fire control parts.
SECTION 3: AM15 FIRE CONTROL ASSEMBLY AND OPERATION
CAUTION: ENSURE THAT YOUR M16 IS NOT LOADED PRIOR TO CONTINUING
CAUTION: If you are unfamiliar with the function and safe handling of an open bolt firearm, you should seek competent assistance, training and guidance before attempting to fire your AM15 Upper Receiver Conversion Kit.
Prior to installing the Lower Receiver Fire Control Parts for your new AM15 Upper Receiver 22 LR Conversion Kit (AM15) into your M16 machine gun lower receiver, first unpack and verify that you have all parts and familiarize yourself with the name of each. Please refer to the photo and the corresponding fire control part numbers:
12. Hammer & Spring Assembly
13. Trigger & Spring Assembly
14. Sear & Spring Assembly
15. Hammer / Trigger Pins
16. Sear Pin
17. Safety Selector
18. Connector Link
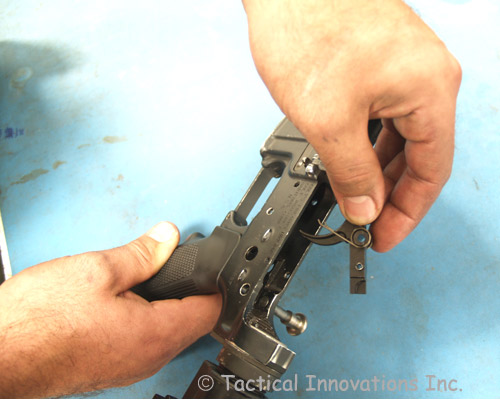
FIRE CONTROL ASSEMBLY:
1. Remove your 5.56 upper
receiver from M16 lower receiver. No parts are interchangeable.
2. If you have not already, remove all closed bolt M16 lower receiver fire control parts to include (1) hammer and pin, (2) trigger, disconnector and pin, (3) sear and pin, (4) selector. Use caution not to lose the detent and spring for the selector that are installed under the pistol grip. It is not necessary to remove the front or rear take down pivot pins, the magazine catch or the bolt catch.
Using the associated AM15 Fire Control cutaway picture, proceed as:
3. Install the TRIGGER & SPRING
ASSEMBLY (#13) in its standard
orientation using the supplied stainless steel TRIGGER PIN (#15).
4. From the left side of the receiver, slide the SAFETY SELECTOR (#17) through
ONLY the LEFT SIDE of receiver. Do not yet push it all the way through the
receiver. Slip the CONNECTOR LINK (#18) over end of selector while both are
inside the receiver, with the little end up and the long end mating with the
pin sticking out of left side of the TRIGGER. With the CONNECTOR LINK captured
by the SAFETY SELECTOR, push the selector though the right side of the receiver
and into its standard installed orientation. Reinstall and tighten the pistol
grip to capture the selector spring and detent.
5. Rotate the SAFETY SELECTOR (#17) to the FIRE position. The SAFETY SELECTOR MUST
be in fire position to continue the installation.
6. Install the SEAR & SPRING ASSEMBLY (#14) using the supplied stainless
steel SEAR PIN (#16). The SEAR & SPRING ASSEMBLY is correctly orientated
with the little hole facing up and the long tail of the spring resting on the
small notch in the SAFETY SELECTOR (#17). The "C" shape of the left
side of the SEAR & SPRING ASSEMBLY will hook under the small extension on
the CONNECTOR LINK (#18). When correctly installed, the CONNECTOR LINK (#18)
must be pinned against the left wall of the receiver fire control pocket by the
tail of the spring.
7. Install the HAMMER & SPRING ASSEMBLY (#12) ensuring that spring tails are
resting in the notches in the TRIGGER (#13). Cock the HAMMER (#12) until the
HAMMER is captured under the mating surface lip of the SEAR (#14). The SEAR
(#14) will hold the HAMMER (#12) back in the “cocked” position. When correctly
installed, when you pull the TRIGGER (#12), the SEAR (#14) will rotate and pull
the HAMMER (#12) down. At
no time does the hammer ever release from the sear and the hammer travel
forward even when firing. The hammer will remain mated with the sear at
all times regardless of trigger manipulation.
CAUTION: Installation of
AM15 fire control parts in your M16 will NOT permit 5.56 Colt LMG operation and
should not be attempted.
You will NOT be able to use a .5.56 open bolt configuration bolt carrier with the supplied AM15 open bolt fire control parts. The Colt Light Machinegun fire control parts require an additional piece on the sear in order to operate with a 5.56 bolt in a Colt LMG open bolt configuration. The sear provided with the AM15 conversion kit has the holes in the correct positions to accommodate the additional sear piece but it is intentionally not included with the AM15 kit since the AM15 kit does not require the hammer to ever disconnect from the sear.
Your AM15 open bolt fire control parts are now installed and you can proceed with the installation of the AM15 Upper Receiver onto your M16 lower.
SECTION 4: AM15 UPPER RECEIVER FINAL ASSEMBLY
CAUTION: ENSURE THAT YOUR M16 IS NOT LOADED PRIOR TO CONTINUING
CAUTION: If you are unfamiliar with the function and safe handling of an open bolt firearm, you should seek competent assistance, training and guidance before attempting to fire your AM15 Upper Receiver Conversion Kit.
With the BUFFER ASSEMBLY installed and correctly spaced in the upper receiver and your AM15 Fire Control Parts correctly installed, proceed to install the remainder of the upper receiver as:
1. Ensure that the CNC MACHINED FEEDBLOCK ASSEMBLY (#5) is securely seated in the UPPER RECEIVER ASSEMBLY (#1) in the corresponding mating area with the front of the CNC MACHINED FEEDBLOCK ASSEMBLY lugs securely locked into the BARREL (#3) mating cutouts.
2. Reinstall the TOP COVER ASSEMBLY by matching the cutouts in the TOP COVER ASSEMBLY to the mating cutouts in the UPPER RECEIVER ASSEMBLY and then with the TOP COVER ASSEMBLY down firmly on the UPPER RECEIVER, slide it backwards to lock the detent on the left side.
3. When the TOP COVER ASSEMBLY is installed
on UPPER RECEIVER ASSEMBLY, inspect the distance between the bottom of the TOP
COVER ASSEMBLY and the FEEDBLOCK ASSEMBLY. This adjustment is pre-set prior to shipping
but you should verify that the TOP COVER ASSEMBLY has minimal pressure on the
FEEDBLOCK ASSEMBLY to keep the FEEDBLOCK ASSEMBLY securely in place. Correct
tension of the TOP COVER ASSEMBLY on the FEEDBLOCK ASSEMBLY is accomplished by
adjusting the set screws on the bottom of the TOPCOVER ASSEMBLY until they are minimally
in contact with the FEEDBLOCK ASSEMBLY while ensuring that the TOPCOVER
ASSEMBLY can still be easily removed and installed without damage to the
TOPCOVER ASSEMBLY or requiring excessive force. Once the TOPCOVER ASSEMBLY screws
are correctly adjusted for the FEEDBLOCK ASSEMBLY, no additional adjustment
should be necessary unless you install an alternate FEEDBLOCK ASSEMBLY.
4. Retract the BOLT ASSEMBLY (#6) using the charging handle and verify that the
bolt will lock back onto the HAMMER (#12), which is now acting as a traditional
open bolt sear. If the BOLT does not securely lock in the rearward
position, you will have to (1) verify that the BUFFER ASSEMBLY is correctly
installed and (2) verify that the fire control parts are correctly installed
per the prior instructions for each section.
Your AM15 Upper Receiver is now completely assembled. The actual assembly time
once you are familiar with the process is less than three minutes thus making
changes between your traditional M16 and your AM15 Upper Receiver easy to
accomplish.
Prior to loading your drum the first time or attempting to fire your AM15 Upper
Receiver, you should read, understand and comply with all AM15 OPERATING
INSTRUCTIONS, which are found in the tab above with the same name.
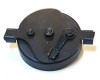
AM15 DRUM LOADING & WINDER INSTRUCTIONS
CAUTION: If you are unfamiliar with the function and safe handling of an open bolt fully automatic firearm, you should seek and obtain competent assistance, training and guidance PRIOR to attempting to use your AM15 Upper Receiver Conversion Kit.
AM15 drums are easy to use once you understand how they work. Everyone that has ever owned an AM180 or an AM15, has at one time or another managed to dump a drum full of ammo on the ground but once you have a little practice with them, you will be all set and ready to load drums efficiently without any issues.
CAUTION: RELEASING THE BRAKE ON A WINDER THAT IS UNDER
TENSION (WOUND) WILL PERMIT IT TO IMMEDIATELY SPIN DOWN RESULTING IN POSSIBLE
INJURY. DO NOT ATTEMPT TO RELEASE THE
SPRING PRESSURE ON A WINDER USING YOUR HANDS.
ALWAYS ASSUME THE WINDER IS UNDER TENSION! AN EMPTY DRUM WORKS WELL TO RELEASE THE WINDER SPRING TENSION WHEN NECESSARY
DRUM LOADING:
1. If you have a winder on the drum, first ensure that the winder does not have tension on it. This can be accomplished by moving the lock on the winder while simultaneously compressing the drum against the BASEPLATE ASSEMBLY and SLOWLY letting the drum spin down until there is no tension on the winder by keeping pressure between the drum and baseplate. With no tension on the winder, remove the winder from the drum. The winder is attached to the drum with two oval “racetrack” springs that the winder will simply snap in and out of. You can easily remove the winder from the drum by pushing the winder studs out of the bottom of the drum with your thumbs.
2. Once you have the winder removed from the drum, the drum is ready to load. You cannot load a drum with the winder attached. To load the drum, turn the drum upside down. You want the hole that the bullets go into and come out of, facing upwards / towards you so you can see through the hole into the drum.
3. Hold the top plastic part of the drum and manually rotate the baseplate until the feed slot is lined up with the blank groove in the drum. It is the only slot that you can not put a bullet into. We’ve also marked the drums with an “X” for new kits when shipped. You want the “X” which represents the blank drum particion to be directly under the feed hole in the baseplate before you begin loading the drum each time.
4. With the plastic drum upside down and the plastic top of the drum on the table in front of you, rotate the baseplate clockwise one cavity division at a time and continue to insert one round of .22LR ammunition into each cavity in the drum with the nose of the round pointing toward the center of the drum.
5. Continue inserting individual
rounds and rotating the baseplate until you have loaded 360 degrees all the way
around without skipping any ammo cavity
positions and you are once again back to the blank groove. At this point,
the follower will elevate over the first round in the drum and you can continue
to add additional ammo while turning the baseplate. In order to fill the drum completely with all three layes of ammunition, you would continue this process until
each individual cavity on all available levels of the drum are filled. The plastic drum that is shipped standard
with all kits will hold three layers of ammunition.
NOTE: For your initial test firing and until you are familiar with the operation of the AM15 Upper Receiver, only fill the first layer regardless of the capacity of your drum.
WINDER FUNCTION:
CAUTION: RELEASING THE BRAKE ON A WINDER THAT IS UNDER TENSION (WOUND) WILL PERMIT IT TO IMMEDIATELY SPIN DOWN RESULTING IN POSSIBLE INJURY. DO NOT ATTEMPT TO RELEASE THE SPRING PRESSURE ON A WINDER USING YOUR HANDS. ALWAYS ASSUME THE WINDER IS UNDER TENSION!
1. Once you are sure that the winder is not wound (under tension), move the brake lever on your winder to "F" (free) position if not already there. Before you can use your winder each time you want to make sure that its always starting to accumulate tension from the same position. Hold the top of the winder in your right hand with the winder brake facing up and manually turn the winder legs with your left hand to begin to put some tension on the spring through the winder legs which will reset the spring to its natural zero position. Once the spring begins to take some tension, allow it to return to its own starting position and the winder is ready to use. You will feel the spring minimally unwind from its overtravel before it will begin to take any tension again in the correct direction. This process should instinctively automatically be done each time before the winder is used.
2. Install the winder in the drum by pushing the legs of the winder all the way into the holes in the drum, ensuring that winder is securely captured by both of the “racetrack” retention springs on the Tactical Innovations Stainless Steel Base Plate which is shipped standard with all AM15 KITS.
CAUTION: IF YOU DO NOT CAPTURE THE STUDS OF THE WINDER WITH THE “RACETRACK” RETENSION SPRINGS, ITS POSSIBLE FOR THE WINDER TO POP OFF OF THE DRUM WHEN WINDING OR DURING USE RESULTING IN POSSIBLE INJURY AS IT SPINS DOWN UNDER TENSION.
3. Before winding the drum, you MUST clamp the drum and the baseplate between your thumb and fingers with enough force to prevent the drum from spinning (or moving at all) on the baseplate as the winder is turned to apply tension for spinning force during firing. For a right handed shooter, your left hand will capture the drum against the baseplate by squeezing the two together while your right hand will wind (turn) the winder.
4. The spring tension on the winder is CRITICAL for the reliable operation of the AM15 Upper Receiver. The amount of tension on the drum via the winder spring is determined by the number of times you wind (turn) the winder. The number of times you will wind the winder is dependent on the size drum you are using and the number of layers of ammunition that you have in the drum.
Assuming the winder has been correctly pre-set per Step 1 above, the correct winding procedure is 2 1/2 complete turns PLUS an additional complete ONE turn for each full layer of ammunition in the drum. For example, the supplied 165 round drum will contain 3 layers of ammunition when full loaded. Therefore, the winder should be turned 5 1/2 turns representing 2 ½ complete initial turns and then an additional 3 complete turns (one for each layer of ammunition).
PRO TIP: Since it is not possible to turn the winder one complete turn at the same time, all shooters can be heard counting to themselves as “half, one, half, two, half, three” to reflect the standard pre-load and then immediately continuing with “half, one, half, two, half, three” as the spring is tensioned for 3 layers of ammunition. Its very easy to lose count if you try to get to 5 ½ turns when turning them in half turn increments and an incorrect winder tension will decrease functionality considerably.
5. Once the winder has been wound the correct number of turns, do not yet release the grip of your left hand between the drum and the baseplate or all of your ammo will be dumped on the floor from the drum by the winder’s turning force. While maintaining pressure between the drum and baseplate, move the lever on the winder off of "F" and into the detent to lock the winder spring tension. Carefully release your left hand pressure between the baseplate and the drum and the drum should not rotate.
The drum is now ready to fire.
NOTE 1: Drums can be loaded and stored indefinitely and then simply add the winder and wind when you are ready to shoot. It is much nicer to load multiple drums at home before you go to the range.
NOTE 2: If you drop the drum, especially when it has the additional weight from being loaded, it will damage the drum and be no longer be usable.
NOTE 3: The baseplate will get a layer of bullet lube on it inside the drum from the rounds going around the drum as they sit on the baseplate. You will need to disassemble the drum periodically and clean the baseplate (which should be only LIGHTLY oiled upon resassembly) to ensure reliable operation.
NOTE 4: If you have or want to use other plastic drums from E&L in addition to the drum that is supplied with the AM15 Kit, we strongly recommend our STAINLESS STEEL BASEPLATE ASSEMBLY which will :
4.1 eliminate baseplate flex
4.2 provide the correct feed geometry ramp for the AM15
4.3 provide more positive winder retention compared to the plastic fingers of the plastic baseplates that are prone to breaking.
However, if you use another plastic drum, you will have to modify the drum by using a razor knife to trim approximately .040 off of each of the ammunition dividers in the drum all the way around the drum for clearance.
AM15 OPERATING INSTRUCTIONS
! DANGER ! Although it's "only a .22", the AM15 Upper Receiver Kit is not intended for and should not be fired by children or inexperienced shooters.
CAUTION: If you are unfamiliar with the function and safe handling of an open bolt fully automatic firearm, you should seek and obtain competent assistance, training and guidance PRIOR to attempting to use your AM15 Upper Receiver Conversion Kit.
AM15 UPPER RECEIVER OPERATION:
1. Make sure the gun is pointed in a safe direction.
2. Rotate the safety selector to the SAFE position.
3. Install the filled drum on the AM15 Upper Receiver by slipping the front tab of the baseplate under the lip on the barrel, ensuring that the drum is correctly centered and mated with the vertical pin. The rear of the drum is correctly seated by sliding the rear tab of the drum baseplate through the corresponding slot in the top cover. Push down gently on the rear of the drum until the drum snaps under the mag catch. Firm pressure may be required but you should not strike the drum as damage to the drum might occur. Ensure that the drum is all the way down and that the MAG CATCH HAS RETURNED TO THE FORWARD POSITION before proceeding.
4. Move the lever on the winder to the "F" position to release the brake on the winder and put spring tension on the drum. The drum will now rotate mimimally and force the ammunition against the feedblock. The drum is unable to turn additionally until the ammunition is allowed to feed through the feedblock during the firing sequence.
5. With the gun pointed in a safe direction and ensuring that your finger is OFF the trigger, retract the bolt using the charging handle to its full rearward travel position. Continue to use the charging handle to allow the bolt to move forward until it catches on the hammer in its rearward position. The bolt will now remain in its rearward position until the trigger is pulled and the gun is fired.
6. With the bolt in the locked rearward position, return the charging handle to its fully forward position. The charging handle does not reciprocate with the bolt and needs to be in its forward position to not interfere with the reciprocating movement of the bolt.
7. With the barrel pointed in a safe direction, rotate the safety selector to the FIRE position. The firearm is now ready to fire.
The firing sequence, which is identical to all other open bolt firearms, is as follows:
a. when the trigger is pulled, the bolt is released and travels forward under spring pressure and strips a round of ammunition from the feedblock and chambers it into the barrel chamber. The bolt does not have a separate moving firing pin but instead has a firing pin machined into the face of the bolt. The forward inertia of the bolt crushes the rim of the case and ignites the primer.
b. the force of the expanding powder propels the bullet down the barrel and the opposite reaction blows the bolt back with the spent case pinned to the bolt face by the extractor until it strikes the ejector and is dropped out of the receiver through the M16's magwell.
c. the bolt continues its rearward travel in contact with the STANDARD WEIGHT BUFFER ASSEMBLY until the STANDARD WEIGHT BUFFER ASSEMBLY contacts the ADJUSTABLE LENGTH BUFFER STOP, ending its rearward travel. The recoil spring then pushes the bolt forward to repeat the cycle. The firing cycle continues until either (1) the trigger is released and the hammer contacts the bolt to hold it in the rearward position or (2) the drum is empty and the gun runs out of ammunition or (3) a stoppage occurs such as a failure to feed, failure of the primer to ignite etc.
8. Once the drum is empty, it will "spin down" and fully release the winder spring. Since the last round in the drum does not have any “follower” or additional round to push it through the feedblock and into the chamber to fire it, normally all AM180 firearms will leave one round sitting in the feedblack. For safety, the AM15 CNC MACHINED FEEDBLOCK is designed to crush the last round and stop the bolt, thus ensuring that the round cannot later accidentally be chambered and fired and also preventing the steel bolt from slamming into the face of the barrel.
With your finger off the trigger and the firearm pointed in a safe direction, rotate the SAFETY SELECTOR to the “SAFE” position and retract the bolt using the bolt handle to clear the crushed “safety round” from the feedblock while also visually positively verifying that there is not a round of ammunition still in the chamber.
PRO TIP: The “green plastic cord” that was enclosed with your kit to be used as a feeler gauge when setting the correct distance on the ADJUSTABLE LENGTH BUFFER STOP is recommended to also be used as a safe chamber indicator. After firing and clearing the safety round from the feedblock, simply insert the green plastic cord into the empty chamber and leave it there until ready to fire again.
9. Operate the drum release by pressing it to the rear and free the rear of the drum’s baseplate and then remove the drum from the front slot in the barrel by slightly lifting the rear of the drum and removing drum toward the rear of the rifle. The drum is now free from the rifle and can be completely removed.
10. When you have a stoppage, with the firearm pointed in a save direction, perform each of the following steps to clear the rifle:
10a. Rotate the safety selector to safe.
10b. Move the winder brake to the “LOCK” position.
10c. Retract the bolt to its full rearward position as held by the hammer.
10d. With the winder locked, retract the drum release and lift the drum slightly up and to the rear to remove the drum assembly from the rifle. If the winder still has bullet pressure on the rounds in the feedblock, you may have to minimally push the rear of the drum to the right to overcome the force of the winder spring while lifting it off.
10e. With the drum removed, you can easily remove the usually 2 rounds of ammunition that will be sitting in and on the feedblack.
10f. Verify that no ammunition or brass is in the chamber. If there is, it should also be removed and cleared before proceeding.
10f. Manually retract the bolt multiple times while depressing the trigger in order to verify the smooth and unrestricted travel of the bolt in the receiver against the buffer assembly.
The rifle can then be returned to firing ready status per the original directions above.
TROUBLE SHOOTING:
1. Until you are familiar and comfortable with the operation of the AM15, only load one layer in your drum.
2. Don’t experiment with inexpensive lesser powered ammunition until the AM15 kit is broken-in and you are very familiar and comfortable with its operation. At least initially, shoot CCI Mini-Mags to minimize ammunition related stoppages.
3. The AM15 Kit works better the more it gets shot. Although it’s been test fired before shipping, expect a break-in period of no less than 1000 rounds (which is not very much considering the drum capacities). During the break-in period, long bursts and full drum runs are preferred compared to many short bursts. During the break-in period, the internals and moving parts of the AM15 Kit like to be very well lubricated with a light oil.
4. After cleaning, a LIGHT OIL should be liberally applied to the interior of the Upper Receiver, the mating portion of the Top Cover, especially the Bolt Pad (block that the bolt rides on) as well as to the bolt and the feedblock. No oil is necessary on the buffer assembly. Light oil is required since a thick oil (or even grease) will overly increase the drag and will result in frequent stoppages
5. When you realize the quantity of ammunition you shoot with the AM15 for each use, expect to clean the kit after each use to minimize dirt related stoppages . As the dirt builds up, your reliability will go down… Standard industry accepted cleaning equipment, chemicals and processes should be practiced.
6. It is important to ensure that the hammer does not “drag” on the bottom of the BOLT ASSEMBLY when firing and create additional drag which will cause a stoppage. Regardless of the burst length, when you want to shoot, pull the trigger hard and keep it fully pulled to its maximum rearward travel. When you are ready to stop shooting, similarly release the trigger crisply to engage the hammer and capture the bolt in its rearward travel.
7. The AM15 relies on the minimal recoil of the 22LR round for reliable function. As a result, for reliable operation especially with weaker powered ammunition, its important to firmly shoulder the rifle so that the stock is solidly against your shoulder. Hotter ammunition will be less prone to stoppages caused by a “limp wrist” condition which will not allow the gun to recoil completely. This situation will often manifest itself with less experienced shooters.
8. For the ultimate in reliability and durability, we are not offering MACHINED BILLET ALUMINUM DRUMS for the AM15. Please refer to our webpage for additional information.
9. Since the fired brass is ejected out the bottom and through the M16 magwell, you can easily make a brass catcher from a 5.56 magazine that is gutted and minimally modified. However, be aware that the brass catcher will cause occasional stoppages from brass literally hitting the top of the gutted mag and bouncing back into the path of the bolt. For best reliability, simply allow the brass to fall freely out the bottom onto the ground.
10. Lead, bullet lube, dirt, carbon etc will occasionally build up and begin to fill up the extractor slot under the chamber of the barrel. When this happens, the extractor on the bolt is unable to complete its full forward travel and you will experience stoppages from light primer strikes. Use a machinist’s pick or similar through the magwell of your M16 to quickly and easily clear the extractor slot prior to firing.
11. The baseplate will get a layer of bullet lube on it inside the drum from the rounds going around the drum as they sit on the baseplate. You will need to disassemble the drum periodically and clean the baseplate (which should be only LIGHTLY oiled upon reassembly) to ensure reliable operation.
12. A suppressor will increase back pressure and will permit less expensive, less powerful ammunition to still be used with the Standard Weight Buffer Assembly and Standard Force Buffer Spring rather than having to swap the spring and setup a different buffer weight for the less powerful alternative ammunition.
FACTORY TUNING TO A CUSTOMER’S M16
Your AM15 Upper Receiver Assembly is thoroughly tested and will run using a COLT FACTORY M16. Although only infrequently encountered, due to the minor tolerance differences with other converted receivers, minimal fitting may be required. However, it has been our experience that the AM15 Upper Receiver will work as intended on most M16 lowers, regardless of manufacturer.
However, in the event you are unable to successfully get your AM15 Upper Receiver to work with your lower, we are happy to assist. You can call our customer service team and if none of our AM15 techs are available, please leave your name and number and a tech will return your call as soon as possible.
For a period of sixty days from the shipping date, if you have reason to believe that there is an issue with your AM15 Upper Receiver (assuming that the AM15 Upper Receiver has not be modified or damaged) please contact our customer service staff and upon our issuance of an RMA number and your return of the unit to our facility, we will once again testfire your AM15 Upper Receiver using a Colt factory M16 lower receiver to verify successful function at no charge to the original purchaser.
Although seldom necessary, once the function of the AM15 Upper Receiver has been verified with our in-house Colt M16 lower receiver, if desired we can fit your upper to your M16 lower and again test fire with your M16 lower based on our shop time rate of $60 / hr and test firing ammunition costs, which combined will generally totally $150 or less. Shipping and insurance costs both ways would be the customer’s responsibility.
 This product can expose you to chemicals including lead, which are known to the State of California to cause cancer and birth defects or other reproductive harm. For more information go to www.P65Warnings.ca.gov.